

TRAPPED

DEVELOPMENT INFO
GAME: Half Life 2: Episode 2
GENRE: FPS
TOOL: Source/Hammer Editor
DEV TIME: ~75 hours
RESPONSIBILITIES
-
Initial concept
-
LDD/Documentation
-
Whitebox layout
-
Gameplay scripting
-
Aesthetic polish
-
AI implementation
-
Everything from beginning to end


Download "Trapped"
Link to Design Document
SUMMARY
“Trapped” is a singleplayer first-person shooter level created in the Half Life 2: Episode 2 engine. The level takes place in the Half Life 2 universe, with the player assuming the role of a soldier in the battle-scarred ruins of City 17 tasked with escorting a caravan of medical supplies out of the city. The level emphasizes city combat, utilizing a combination of NPC AIs and scripted scenarios to give the player the sense that they are participating in exhilarating firefights that culminates in an intense battle with an enemy helicopter.
Video Walkthrough
WALKTHROUGH

Overview of Map
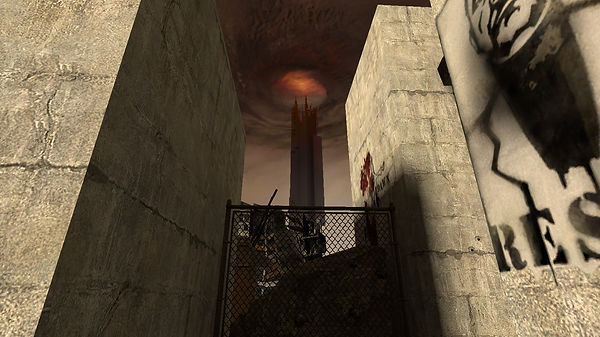
1. Player starts off facing a "RESIST" poster amidst war-torn city ruins, establishing the scene. Drawn towards the poster, the player moves forward and left, taking them to a courtyard.
2. As soon as the player enters the courtyard, they encounter a squad of rebels trapped by a sniper in a window above. One rebel promptly gets sniped, and the leader of the remaining rebels shouts at the player to get down. Soon after that, a beeping noise draws the player's attention to a locked door on the left, signaling an incoming door breach.

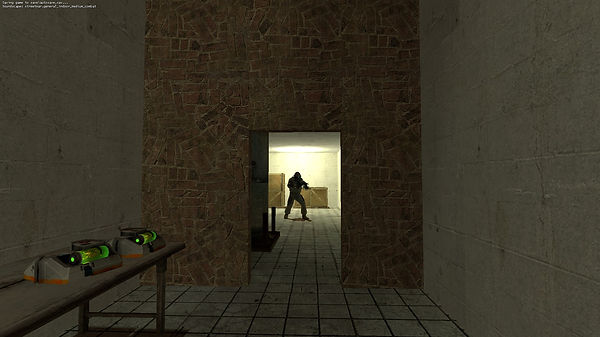
3. The door to the nearby cafe blows open, and 2 Combine soldiers w/ SMGs enter the courtyard. The Combine soldiers trade fire with the rebels, and are taken out. The player enters the cafe and replenishes health at a table. As they move into the cafe backroom, a Combine soldier rounds the corner. Another Combine soldier waits just around the bend.
4. After taking out the Combine soldiers, the player exits into a back alley and proceeds past the corpses of two civilians who couldn't quite escape the Combine's oppression.
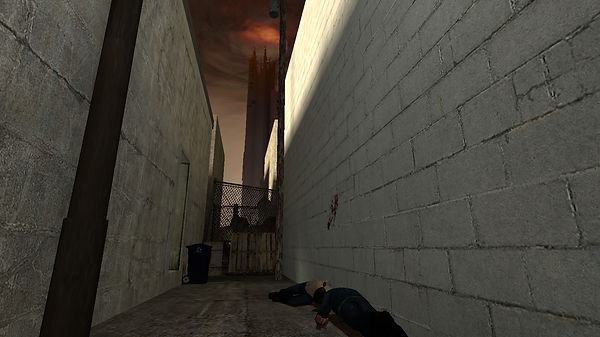
5. The player rounds the bend and encounters three rebel soldiers attempting to fight back against a strafing Combine helicopter. BOOM! One soldier goes flying over the fence. The second soldier falls soon after. The last soldier panics, pivots around, and tries to cut through the fence to escape the helicopter. He gets shot to pieces. The helicopter flies off soon afterwards, seemingly oblivious to the player's presence.

6. Moving on, the player ascends a ramp towards a door. As they get closer, they pick up on Combine chatter on the other side of the door. The player opens the door and immediately has to take out a soldier hiding behind the counter. Moving into the next room (a lounge), the player encounters two Combine soldiers. The player takes out the soldiers and moves on to a locked door.

7. After taking out the Combine enemies in the lounge, the player notices the locked door (boarded from the other side) and a vent next to it. The player must take the vent to advance. Crawling through the vent, the player picks up a health kit along the way.
8. The player exits the vent directly above the sniper's nest. The Combine sniper hears the player coming up behind him, and greets the player with a shotgun. The player takes out the sniper. The rebels in the street below call up to the player after the sniper has been dealt with, and informs the player that another squad is trying to get the gate open by assaulting the control room of a nearby warehouse. The player is tasked to help the squad out.

9. The player exits the sniper's nest and destroys the board keeping the door locked. Re-emerging in the lounge, the player spots a couple rebels moving across a catwalk outside in preparation for the warehouse assault.
10. As the player leaves the lounge, however, they hear a familiar beeping noise, signalling a door breach. BOOM! The wall next to the door explodes, and Combine soldiers pour through the hole, ambushing the player. The player takes out the Combine soldiers and moves to the Warehouse courtyard.
11. The player enters the warehouse courtyard. Four rebels dash across the courtyard and enter the warehouse, engaging a group of Combine soldiers within. The player jumps down and joins the rebels just as they are getting overwhelmed.
12. A massive battle erupts in the warehouse. The player maneuvers through the warehouse, taking out Combine soldiers and climbing boxes to reach the upper catwalks and access the gate control room.

13. The player reaches a control room and is ambushed from behind by a Combine soldier waiting inside. After taking out the soldier, the player presses the button to raise the gate. However, the gate jams on the way up. Before the player or any of the rebels can react, the helicopter swoops over the control room and opens fire on the convoy below. The rebels send out a distress call.
14. The player exits the control room. As they do so, the windows near the top of the warehouse shatter, and a contingent of Combine soldiers rappel down from both sides. A few more soldiers sweep in through the entrance and lock the door behind them. The player takes out all of these soldiers, including one more that enters through a previously locked side door.

15. The player exits the warehouse through the side door and jumps off a broken catwalk onto the street below. They pick up a rocket launcher from the dead body and enter the street. As they do so, the helicopter turns its attention away from the convoy and towards the player. The player and helicopter engage in an intense battle, with the player firing rockets at the helicopter and the helicopter responding with automatic gunfire of its own.

BREAKDOWN
The Intro
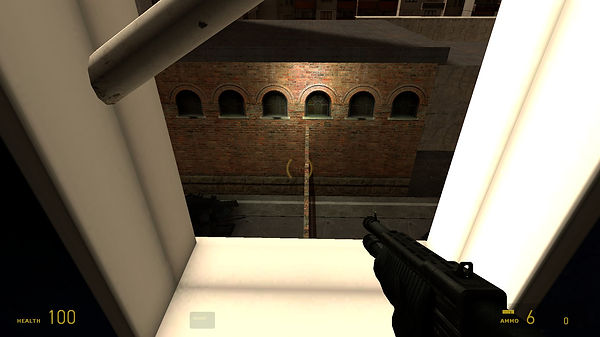
The above screenshot depicts a scene seen near the beginning of the level: the memorable image of the Citadel in the distance and the hellish portal rift above it. When I saw this image of the Citadel in the background of Half Life 2: Episode 1, I immediately understood that whatever was happening, it was significant enough to impact the lives of many, many people in the in-game universe, and that thought was enough to add significance to my role as savior of the people (Gordon Freeman). I found it fascinating that such a simple image could inspire such emotions, and wanted to capture that sense of awe and despair in my level, so I aimed to recreate that view in my level. This view continuously haunts the player as they make their way through “Trapped”, with each encounter wholly intentional and framed- although their surroundings change, the player can’t escape the shadow of the Citadel. In this particular instance, the hellish silhouette of the Citadel, combined with the wrecked buildings, blood and Resistance poster in front of it, gives the player a quick crash course of the world they are currently in.
Lines
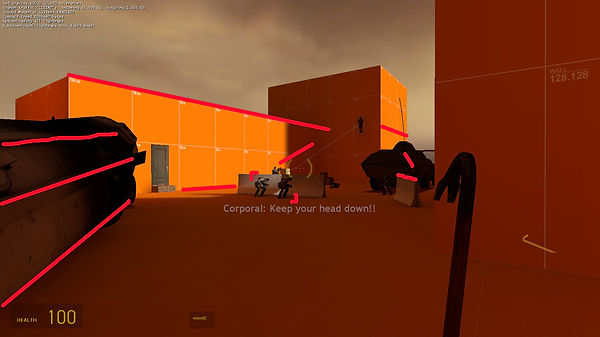
In this courtyard, the player stumbles across a Resistance medical convoy trapped by a Combine sniper. Two rebels already lie dead in the courtyard, and a third is promptly shot as soon as the player enters the picture. The surviving rebels tell the player through text “Hold your fire! He’s too fortified up there!”, informing them that they should hide too if they don’t want to get their head sniped off by the sniper in the window. On a contextual level, this scene establishes a low point for the rebels- already trying to escape the increasingly volatile Citadel behind them, they have been caught in a trap and must cower behind barricades if they want to live. In terms of gameplay, this scene establishes an immediate objective for the player: Help the rebels out of their predicament by taking out the sniper!
One thing I aimed to focus on during the development process was conveyance. I think this scene does a good job of drawing the player’s attention to the sniper’s window to the point where an outside observer can point out the window just by looking at this screenshot. I put a lot of effort into making sure most of the lines and geometry draws the player’s attention to the window naturally. While I invested a lot of time into developing subtle guiding scenes like this one, conveyance was still a major challenge throughout development- and I learned that a lot of the developer’s attempts at conveyance will fly over the player’s head, and that there is an art to balancing subtlety and loud obvious conveyance mechanisms.
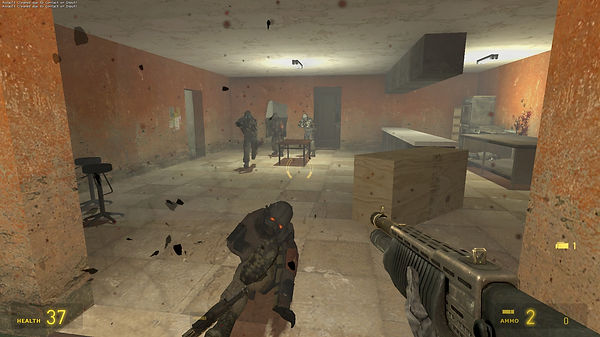
Allied NPCs
The gameplay of “Trapped” relies a lot on the traditional gun-based combat seen in Half Life 2 and many other first person shooters. However, I wanted to emphasize the bigger picture struggle, and call attention to the idea that while the player plays the role of a capable soldier, they are not alone in their struggle for survival. They have comrades, friends and allies who go through the same highs and lows together. In the first courtyard battle, the player is caught by surprise when two Combine soldiers breach a nearby door. The player feels vulnerable because they are already pinned in the courtyard by a sniper, and they only have a crowbar as a weapon. In this brief moment they must rely on their allies to protect them.
I simulated a lot of AI vs AI battles in preparation for the creation of this level, and I discovered through these simulations that the friendly NPCs can hold their own in combat- so much so that a single rebel soldier can take out at least 3 or 4 Combine soldiers without dying. I used that to my advantage here: the 2 AI-controlled Combine soldiers breaching through the door have to fight 3 AI-controlled rebel soldiers. Every single time, the rebels prevail as they should, allowing the player to pick up the dead Combine soldiers’ weapons and proceed onward on their objective to kill the sniper. I left the battle up to the AI in this particular sequence to predictable results. However, over the course of development I discovered that when you add more variables, the AI vs AI battles can become very unpredictable, a challenge I had to design for in the later portions of this level.
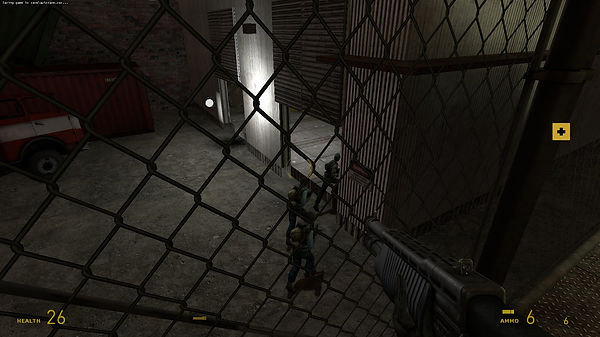
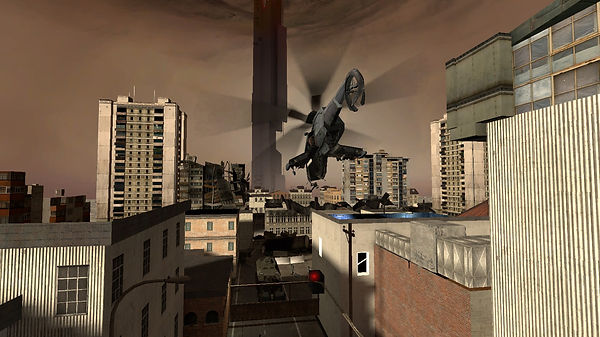
The Helicopter

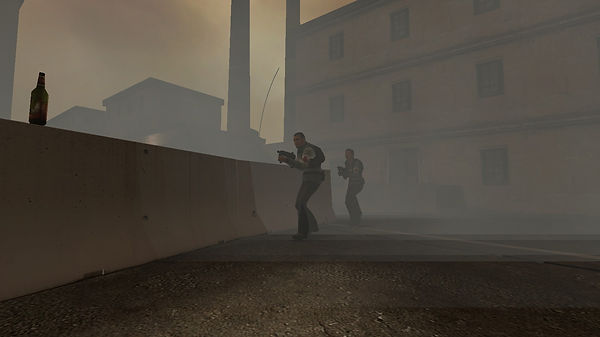
Aside from the rebels in the courtyard, the one other constant provided to the player in this level is the helicopter in this screenshot. When the player first sees the helicopter, they see it raining death down on a couple poor rebels (one of whom is futilely trying to escape through the fence here). This scene teaches the player that the helicopter is a menacing threat, and also informs the player that they will have to deal with it later.
Early on in development, players had trouble recognizing the significance of this helicopter. Some players did not realize that the helicopter in this scene and the helicopter they had to fight towards the end of the level were the same one. To fix this, I took steps to increase the helicopter’s importance in the player’s field of vision. For example, player tended to miss this scene (where I introduce the helicopter) because their angle of entry took them towards the building to the right. I added a truck positioned diagonally in front of the player to draw the player to the left, bringing the helicopter and two rebels into view at the angle seen in this screenshot.
Warehouse Battle
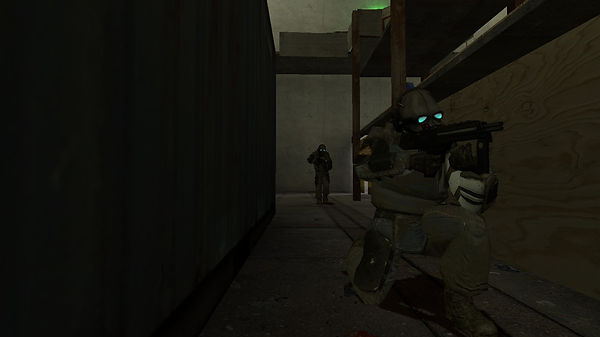
The warehouse battle towards the end of my level went through the most iteration through the course of development. When the player reaches the warehouse, they find themselves caught in the middle of an intense battle between 6 Combine soldiers and 3 rebel soldiers. The battle had to be interesting even without player involvement, and I tried to reflect that in the warehouse layout while also dressing the location to look like a functioning warehouse. The main cover structures consisted of storage racks, shipping containers, boxes, and barrels. I added the storage racks late in development to replace placeholder boxes, and found that changing the placeholder BSP boxes to storage boxes added a lot of dynamic maneuverability options to the battle- NPCs can weave around/duck under the racks and take cover behind diagonally-positioned models, adding an extra layer of intensity to the battle. I also discovered that the player could crouch under the bottom platform of the racks, and added in a crawl space that the player can potentially go through to flank the enemy while the rebel soldiers distract them.
The battle itself was tough to balance because even though the Combine soldiers outnumbered the rebel soldiers, the AI programming ensured that the rebel soldiers could consistently gain the upper hand in the battle (which I did not want because that would make the sequence too easy for the player). I addressed this by placing the Combine soldiers on fortified positions higher up on the catwalks, and scripting them to toss more grenades at the rebel soldiers to wipe them out earlier. I balanced the battle to the point where if a player plays normally, they can- more often than not- enter the warehouse just in time to see the rebel position overwhelmed by the Combine forces. Of course the results of the battle varies widely in each playthrough (sometimes the rebel soldiers take out a majority of the Combine soldiers before the player gets there), but I like the dynamic possibilities presented by pitting two opposing AI squads against each other.
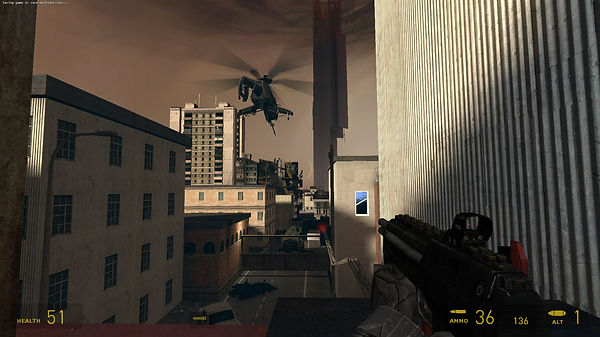
Urgency
After dispatching the Combine forces, the player presses a button to open the gate for the convoy. However, the helicopter interrupts this brief moment of relief by flying over the player and opening fire on the convoy. I positioned the button so that the player faces the convoy and the Citadel when they press it. When the helicopter flies towards the convoy, it immediately provides the player with a new clear objective: “Help out your allies!”
16. After a multitude of hits, the helicopter bursts into flames and enters a death spiral. The helicopter crashes into the gate, destroying it and finally opening a path for the convoy to continue.
