

COME PLAY WITH ME

Spoiler alert.
DEVELOPMENT INFO
GAME: The Elder Scrolls V: Skyrim Special Edition
GENRE: First-Person Action RPG
TOOL: Creation Kit
DEV TIME: ~100 hours
RESPONSIBILITIES
-
Initial concept
-
LDD
-
Whitebox layout
-
Gameplay scripting
-
Full dialogue trees
-
Modkit implementation
Link to Design Document


Download "Come Play With Me"
SUMMARY
“Come Play With Me” is a story-based singleplayer side-quest mod for The Elder Scrolls: Skyrim Special Edition. In this quest, the player travels to Dunhearth Keep and attempts to solve the murder of the keep’s jarl, who was found dead the previous night. The quest is very open-ended, with the player able to present evidence obtained throughout the castle and accuse at least three different characters of murder at any given time (with relevant evidence). The more perceptive player may also find inconsistencies within the case that cause them to investigate further, revealing the true culprit and leading to a chilling confrontation with the Daedric Prince Boethiah, who presents the player with a morally grey dilemma. Players exercise their interpretive observation abilities and various Sneak-related skills to complete this quest.
PROJECT INFO
-
Branching questline with many different ways to experience it
-
Elaborate murder mystery with three potential suspects in Skyrim universe
-
Emphasis on dialogue, character, and intrigue
-
Features clues that tell history of characters and events
-
Twist ending and chilling confrontation with a Daedric Prince
 Dunhearth Keep InteriorMain interior space of the keep | 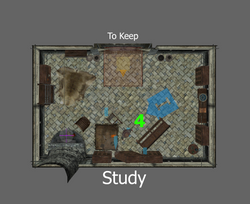 StudyThe crime scene |  CourtyardSmall exterior space north of main keep |
|---|---|---|
 StoreroomSmall storeroom located west of courtyard |  CellarSetting of final confrontation... |
Map of Dunhearth Keep
VIDEO PLAYTHROUGH
WALKTHROUGH
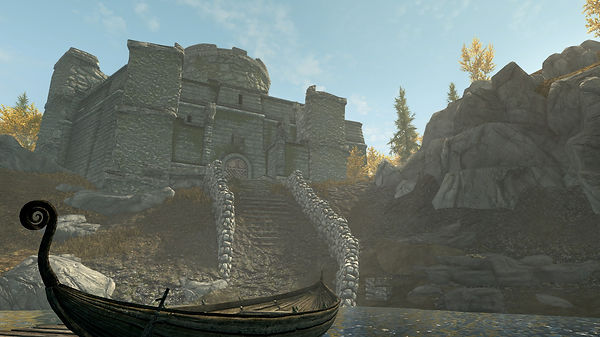
1. Player encounters a fisherman near Riverwood Bridge who offers to take the player to Dunhearth Keep, where a murder has recently taken place. Should the player accept, the player and Fisherman both teleport to the front of the keep. The player enters Dunhearth Keep and encounters the Steward.
2. The Steward updates the player on the situation: The Jarl of Dunhearth Keep has been murdered, and a small detachment of soldiers from the Imperial Legion are investigating three possible suspects (Prima, Eolyn, and Mendal). The Steward does not trust the Imperials, so he hires the player to also conduct an investigation of their own.

3. The player follows the Steward to the entrance of the crime scene (the Study), and is granted access to investigate.

4. In the Study, the player finds the body of the Jarl amidst a grisly scene. Several clues lie next to the body that the player can choose to pick up: a bloody knife, a book about Boethiah, a curfew dossier, and a creepy doll.

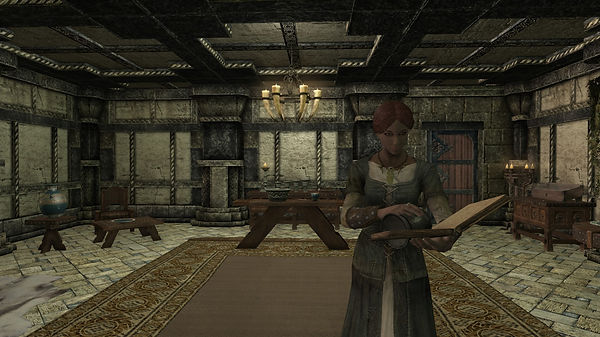
5. Upon leaving the study, the whole keep opens up to the player, leading to a variety of investigation options. The player may consult with the Imperial detachment for details regarding the evidence they have collected in their inventory, and interrogate the three suspects. One suspect, Lady Eolyn, is the wife of the deceased Jarl who has taken control of the keep. She can be found sitting on the Jarl's throne in the main throne room. She is uncooperative in the investigation, and looks down on the player for attempting to interrogate her. Lockpicking her room in the East Wing of the keep reveals a "Letter to S", implying Eolyn has been planning to murder her husband and consolidate power.

6. The second suspect is Mendal, the court sorcerer of sorts who has a rather haughty personality. He can be found in his room in the East Wing of the keep, north of the crime scene.
The player can pickpocket his closet key and sneak into his back closet to find a gruesome scene with pools of blood and human body parts. "Mendal's Journal", found here, reveals Mendal to be a thirsty necromancer hired by the Jarl to perform experiments in secret.

7. The third suspect is Prima, the primary caretaker of the Jarl's two children, Arisa and Boen. She is good-natured and caring, and has been hit hard by the Jarl's death.
However, if the player succeeds a speech persuasion check, they will discover that Prima has been seeing Mendal every night in the Storeroom out in the courtyard...

After interrogating the three suspects, the player may return to the steward to accuse any one of the three for murdering the Jarl, using the incriminating evidence as the final nail in the coffin. The Imperial Captain then places the accused under arrest, and the Steward rewards the player with the Dunhearth Keep family heirloom- a cool sword. Open-and-shut case... or so it appears.
The path to the True Ending begins here
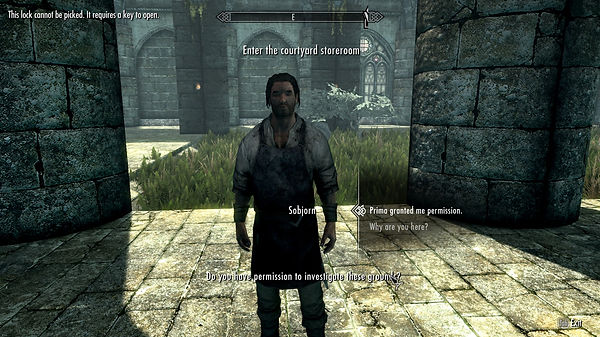
8. If a perceptive player thoroughly investigates the three suspects and stumbles upon all three pieces of evidence, they can come to the conclusion that things don't quite add up, warranting further investigation. Passing a speech check with Prima reveals that Prima has apparently been seeing Mendal every night in the courtyard storeroom, breaking curfew and throwing both of their alibis into doubt. To clear her name, Prima agrees to give the player access to the courtyard for further investigation. With permission, the player can get past this guard blocking the courtyard door.
Entering the courtyard, the player locates the storeroom in the back left corner of the area.
9. The player tries to open the storeroom door, but finds that it is locked. The player is then immediately approached from behind by Sobjorn, the servant who greeted the player at the keep entrance. Sobjorn wonders why the player is snooping around, to which the player can convince Sobjorn to unlock the storeroom for the sake of the investigation.
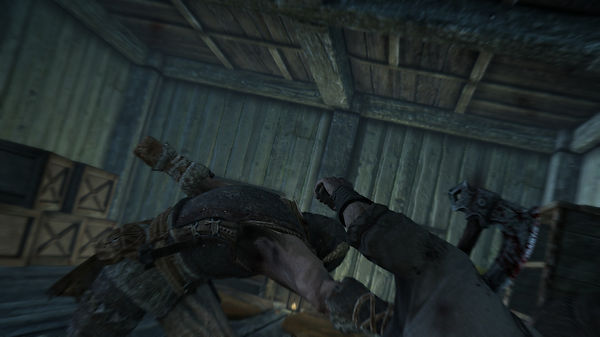
Entering the storeroom, the player can find two bedrolls and a handwritten note corroborating Prima and Mendal's scandalous affair, alleviating suspicion from both of them. However, as the player investigates, Sobjorn suddenly attacks the player from behind. The player kills Sobjorn in self defense.
10. Looting Sobjorn's body, the player finds a key to his room as well as a handwritten blackmail letter. The blackmail letter appears to be from the Jarl's real killer, and threatens to kill Sobjorn's daughter if he doesn't dispose of the player.
This means that the Jarl's killer is still on the keep premises, and is acutely aware of the player's presence...

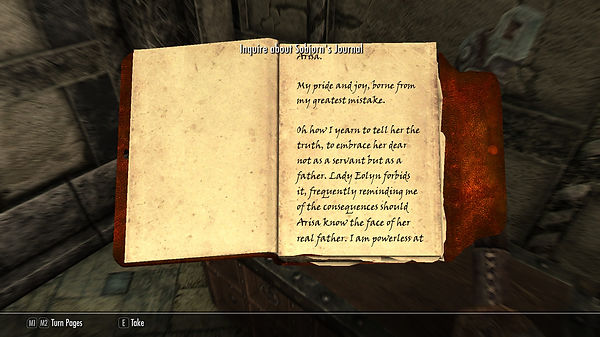
11. Unlocking and investigating Sobjorn's room reveals Sobjorn's Journal. Reading the journal, the player discovers that Arisa is actually Sobjorn's daughter born from an illegitimate affair with Lady Eolyn, the Jarl's wife...
12. With this new information available, the player can get more information out of Prima regarding Sobjorn and Arisa. Questioning others around the keep reveals that Arisa frequently explores the cellar at the far end of the courtyard.
13. Entering the cellar, the player confronts Arisa, who at first feigns ignorance but soon admits to committing the grisly murder once the player confronts her with evidence. An entity soon emerges from Arisa, and the truth becomes clear. Arisa has been possessed by the Daedric Prince Boethiah, who sought fit to use Dunhearth Keep as its "dollhouse" and play with the lives of its inhabitants. Boethiah used Arisa to stab her father and create the crime scene to bring all of the keep's secrets to light.
Boethiah gives the player a choice: Kill Arisa and end her torment, or Spare Arisa and allow Boethiah to continue her twisted murder spree.

14. With Arisa dealt with, the player returns to the keep proper. They are confronted by the denizens of the keep, who have discovered Sobjorn's body and are aware of Arisa's disappearance. Eolyn interrogates the player, suspicious of them and at her wit's end. The player can confess to Sobjorn's murder or attempt to tell the truth. They can even try to warn them about Boethiah's involvement. However, all this is for naught, as the player is eventually banished from the keep forever. The Fisherman arrives to take the player back to Riverwood Bridge.
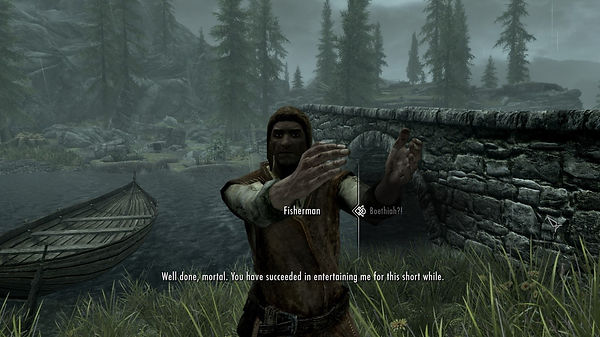
After returning to Riverwood Bridge, the Fisherman recaps the unfortunate series of events. However, he is more knowledgeable about the situation than he should be...
Upon further interrogation, the Fisherman reveals that he is Boethiah in disguise, having intentionally drawn the Dragonborn to Dunhearth Keep to knock them down a peg.
If the player killed Arisa, the Fisherman taunts the player for killing an innocent girl.
If the player spared Arisa, the Fisherman emphasizes that Arisa continues to live in torment, forever aware of the murders her possessed body will commit in the near future.
Either way, the Fisherman leaves the player with a sword (the Goldbrand) before cackling into the night.
BREAKDOWN
For the start of the quest, I wanted to introduce the player to the setting and scenario in a natural, plausible manner befitting of a quest in Skyrim, so I created this Fisherman character to break the news of the murder to the player and offer to take them to Dunhearth Keep. This setup created several challenges: Players started questioning the Fisherman’s role and motive right off the bat- why was a fisherman interested in bringing someone to the keep in the first place? Secondly, making the start of the quest a Fisherman meant I was somewhat limited thematically in where I could put the Dunhearth Keep exterior piece (aka I had to place the keep entrance next to a river). I did a lot of location scouting throughout Tamriel because I wanted to integrate the keep into the base Skyrim world (In fact, I made integrating the quest smoothly into Skyrim a priority throughout the quest).
A few playtesters and stakeholders suggested changing the Fisherman into a Courier of some kind to create more options of keep placement and such, but I liked the thematic idea of having the Fisherman ferrying the player to and from their destination like Charon ferrying souls across the river Styx, which fit the true character of the Fisherman as an avatar of the mastermind Boethiah. Regarding the Fisherman’s role and motive, I iterated on his dialogue in order to strike the balance between clueless fisherman and all-knowing mastermind, eventually settling on having him spout out simple details of the quest at the beginning and acting pretty much like a supernatural being at the end of the quest. Finally, I looked into giving him idle dialogue and AI packages so that he would stand consistently in the same place and shout for the player’s attention every time (to improve conveyance).

Reeling the Player In
Initial Impressions

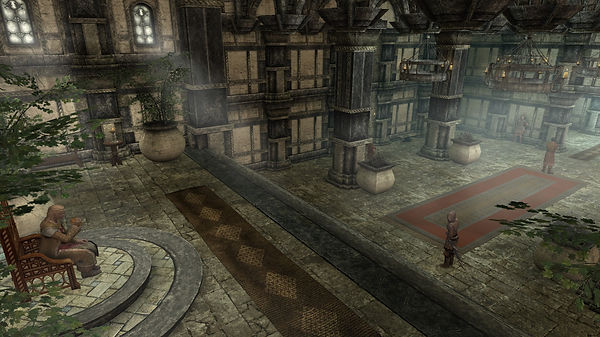
When a player enters Dunhearth Keep, the very first thing they see forms their impressions for the rest of the space. Since my entire quest takes place in Dunhearth Keep, I wanted to give the player a strong first impression, so early on I made the design choice to have an immediate straight view to the throne from the keep entrance. I also separated the immediate entrance area from the main hall so that the player would experience the space opening up around them when they stepped forward, prompting feelings of awe. Creating such a large space led to the challenge of visibility and lighting- Skyrim automatically includes fog settings that kick in after a certain distance from the player FOV, so initially when players entered the keep they would see the back of the main hall and the throne area as a murky blue color. I ended up toning down the fog intensity, distance, and color to create the more subdued look seen in the screenshot above.
Another challenge was making the throne pop- the throne is arguably the most important part of any castle or keep, so I had to make the throne stand out from the rest of the space somehow. My solution to this problem was placing planters and chandeliers that lined up towards the throne from the initial player FOV (seen above) and having light rays pour through windows, directly onto the throne. Ultimately, this made the throne the focal point of the scene, enticing players to go to it (and bump into the Steward along the way).
The Focus on Dialogue
“Come Play With Me” is a very dialogue-heavy quest, relying on character interactions and dialogue choices to advance through the stages towards the conclusion. I had a lot of fun creating the many characters and scenarios in the keep, but also ran into many conveyance challenges, specifically in the beginning stages of the quest. When the player enters the keep for the first time, they are met by the Jarl’s steward, who fills them in with information and gives them the thankless task of finding out who the killer is. This one conversation sets up many player objectives in a narrow frame: Figure out who the killer is, Investigate the crime scene, Interrogate three suspects, and expect a reward for completing the above objectives. Over the course of development, I moved a lot of this information around as I attempted to address player concerns of being overwhelmed with too much information too quickly.
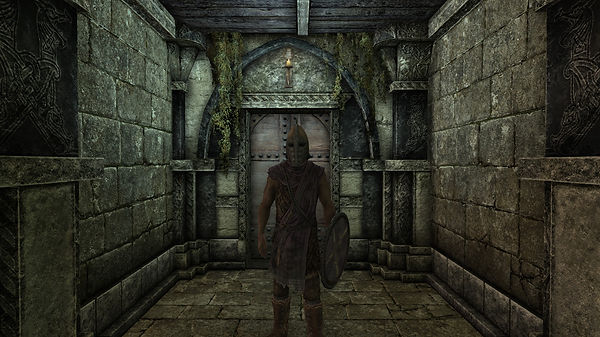
During the first week of playtests, I discovered that players would ignore the crime scene entirely and head straight up to the throne to interrogate the suspects. Since I wanted players to investigate the crime scene before they proceeded with the investigation, I tried turning off the player’s ability to interrogate suspects before they investigated the crime scene. However, this created the conundrum where players talked to the suspects beforehand, became confused that they could not interrogate them, and became lost. I ended up putting the interrogation opportunities back in and sought to find other ways to accentuate the importance of the crime scene. I staggered the display of the objectives during the Steward’s intro conversation, ending with “Investigate the study” at the end of the conversation. I also placed a guard in front of the east hallway entrance, and another guard in front of the study to entice the players in that direction.
Visual Conveyance
Pictured above is my most recent solution for crime scene conveyance, with the purpose of getting the players to investigate the crime scene before they interrogate the suspects. First, I placed the Dunhearth Guard outside the entrance. This guard sometimes carries a super bright torch with them which immediately catches the players eye. This guard also has an idle line that announces the existence of the crime scene beyond the door she is guarding. After placing the Dunhearth Guard, I placed an Imperial soldier just past the study entrance to draw the player’s eyes to the right immediately after entering the hallway. I also placed a wall sconce and carpeting on the ground in front of the study to further draw players towards the study. Finally, I started the door to the east hallway open while starting the west hallway door closed in order to imply that the players should go to the east hallway first.

Here is another example: The crime scene in the Study. In this case, I placed several pieces of evidence in the area and wanted the player to pick them up to be used during character interactions that would happen later in the quest. However, during early playtesting I discovered that some players would leave the crime scene without ever noticing any of the items on the ground. To improve conveyance, I placed candles next to the evidence items to increase visibility, and added a carpet to prevent the evidence items from camouflaging with the tiled floor. Several playtesters also thought that the books randomly generated in the bookcases were evidence items (resulting in them needlessly placing many many books in their inventory), so I ended up locking the bookcases. Regarding the atmosphere of the space, I made extensive use of blood decals combined with flickering candle lights and ambient audio to create a chilling atmosphere.
Player-Friendly Little Details
I structured my quest in a way that allows for players to interrogate each of the suspects, then search their private quarters for seemingly incriminating evidence. Mendal’s room proved to be the biggest challenge because his branch of the quest required the player to pickpocket the key off of him in order to unlock his back closet and access the evidence waiting within. In Skyrim, pickpocketing has a rather low chance of success, and failing a pickpocket check resulted in a hostile NPC pursuing you, looking for a fight. I did not want this to happen with Mendal in particular because he is an essential quest NPC, so if the player picks a fight with Mendal they can never kill him. To solve this issue, I added two more ways to obtain the key to Mendal’s back closet: I placed a spare key in a chest in Eolyn’s room (which the player would find when they were investigating Eolyn), and I included a character known as the Keymaster who would mysteriously appear on a shelf out in the hallway if the player examines Mendal’s door.
The Keymaster proved to be an interesting experiment because players have a very low chance of ever encountering him (since it requires the player to be patient enough to examine the door then leave the room), but I feel that the addition of the Keymaster adds to the lore of the space and gives off the sense that the quest has many layers atop it, waiting to be discovered. With this in mind, I sprinkled a lot of little details such as the Keymaster throughout the space to reward the exploring player.
Hints & Foreshadowing

I used a lot of foreshadowing throughout this quest to heighten the impact of player discovery. For example, the first person the player sees when they enter the keep is Sobjorn, who later turns out to be a pivotal character in the questline. Likewise, the player encounters Arisa early in the nursery room when they interrogate Prima. I placed Arisa in the same room as Prima because to progress to the true ending of the quest and discover the identity of the real killer, the player has to get permission from Prima to investigate the courtyard. Therefore, placing Arisa in the same room as Prima ensured that the player would be informed of Arisa’s existence in the space before the big reveal towards the end of the quest. To further ensure that players would be aware of Arisa’s presence, I created a side quest about delivering a doll from brother Boen to sister Arisa, fleshing out the relationship between the siblings and creating a more powerful dynamic for the reveal later.
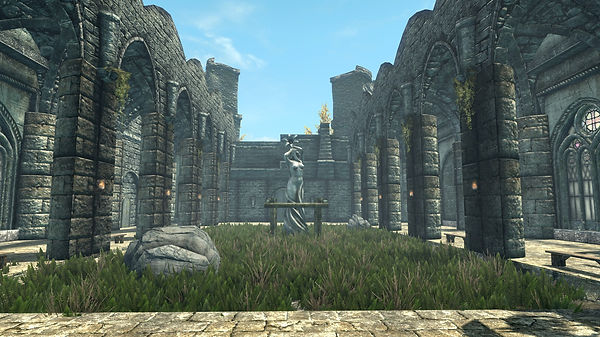
Exterior Spaces

As an exterior space, the courtyard provides some variety and counter-balance to the many interior environments in the Dunhearth Keep space, and serves as a short break between the action spaces in the quest (main interior, storeroom, and cellar). This space is unique because, even though it is an exterior space, it exists separately from Tamriel- that is, the courtyard inhabits a small world space detached from the rest of Tamriel. In order to give the illusion that the player is still in Tamriel, I took special note of the scenery surrounding the keep exterior and replicated the scenery in this space. The two towers behind far wall, the tops of the trees, the stone hill beyond the eastern side of the courtyard- all these details seem peripheral at first glance, but were essential to complete the illusion. As for the courtyard space itself, I intentionally kept it clean and relatively clutter-free to provide contrast to the cluttered interiors of the keep. Playtesters responded very favorably to the atmosphere of this courtyard, so I aimed to keep that atmosphere intact through iteration while making minor adjustments and tweaks here and there.